Trach Suctioning
|
One of the jobs of the upper airway is to warm, cleanse, and moisten the air we breathe. When a trach tube is present the job of the upper airway is bypassed. With a trach tube the air becomes cooler, dryer, and less clean. In response to these changes, the body produces more mucus causing the need for suctioning. Suctioning is used to remove mucus from the tube and trachea to allow for easier breathing. Frequency of suctioning will vary between patients and will increase with respiratory tract infections. Generally the patient should be suctioned every 4 to 6 hours and as needed. It is important to avoid suctioning too frequently, because, the more you suction, the more secretions will be produced.
|
Purpose:
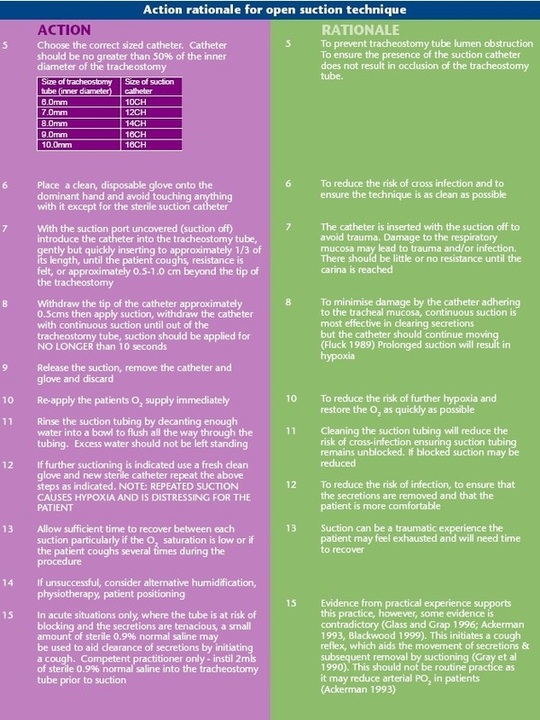
The purpose of trach suctioning is to identify a safe and effective method of removing tracheobronchial secretions to maintain a patent airway using sterile technique, stimulate coughing, to improve oxygenation and improve the work of breathing, to prevent aspiration of food, blood and gastric fluid, to prevent infection and atelectasis, and to collect secretions for diagnostic testing.
The purpose of trach suctioning is to identify a safe and effective method of removing tracheobronchial secretions to maintain a patent airway using sterile technique, stimulate coughing, to improve oxygenation and improve the work of breathing, to prevent aspiration of food, blood and gastric fluid, to prevent infection and atelectasis, and to collect secretions for diagnostic testing.
Assessment:
Assess respiratory system:
Assess patient's ability to cough:
Assess vital signs and signs and symptoms of infection:
Assess LOC and ability to protect airway:
Assess ability to commmunicate
Assess accidental extubation:
- Note rate, depth, and rhythm of respirations.
- Auscultate breath sounds
- Note noisy, wet, or gurgling respirations
- Note signs and symptoms of hypoxemia and hypercapnea (restlessness, confusion, etc.)
Assess patient's ability to cough:
- Note amount and character of sputum
- Normal secretions should be clear and white
Assess vital signs and signs and symptoms of infection:
- Compare to baseline VS
- Note any elevation in temperature
- Note signs and symptoms of infection
- Note change in sputum color or consistency
Assess LOC and ability to protect airway:
- Note presence of cough reflex
- Note any drainage from mouth
Assess ability to commmunicate
- Develop a communication system
- Provide clear explanations to the patient
Assess accidental extubation:
- Keep extra tracheostomy tube and obturator at bedside
Open System Procedure
Equipment:
1. Assess patient's need for
suctioning:
a. Inspiratory wheezing
b. Expiratory crackles
c. Restlessness
d. Ineffective coughing
e. Decreased LOC
f. Decreased breath sounds
g. Tachypnea
h. Tachycardia
i. Bradycardia
j. Cyanosis
k. Hypotension
l. Hypertension
m. Shallow respirations
2. Explain the procedure to pt:
3. Open sterile suction catheter
kit, using appropriate size.
Carefully remove sterile cup.
Fill cup with sterile water.
4. Make sure suction pressure is
set at 120cm H2O for adults,
80 cm in E.D.
5. It is recommended to pre-
oxygenate the patient with the
ambu bag or through the
ventilator and 100% oxygen. This helps to reduce suction-induced hypoxia.
Equipment Preparation:
1. Put on sterile gloves and maintain sterility of dominant hand.
2. Pick up suction catheter and attach to suction source, maintaining sterility of catheter and dominant gloved hand.
3. Dampen catheter in the sterile water to lubricate.
4. Disconnect tube from oxygen source with unsterile hand.
5. Always trace a tube or catheter from the patient to the point of origin before connecting or disconnecting any solution,
infusion or device.
Suctioning Technique:
1. Using sterile hand, gently insert suction catheter fully into trach tube. The tip of the suction catheter should be below
the end of tube. Stimulation of coughing generally indicates catheter is below end of the tube. This helps reduce chance
of a mucous plug forming in the end of the trach tube.
2. Apply intermittent suction by quickly opening and closing suction port with unsterile hand, and withdraw catheter using
a rotating motion. The entire suctioning process should not exceed 10-15 seconds in duration. Intermittent suction
minimizes tracheal tissue damage. Suction is applied only as catheter is being removed to minimize hypoxia.
3. It is recommended to oxygenate, reoxygenate and hyperinflate patient's lungs with ambu bag and 100% oxygen after
each suctioning attempt.
4. The catheter may be flushed with sterile water and the suctioning process repeated as indicated.
5. Upon completion of suctioning, re-attach patient to ventilator or oxygen source. Reassess the patient's respiratory
status.
6. Once trach suctioning has been completed, the oral cavity should be cleansed and suctioned using the suction
catheter as secretions also accumulate in the nasopharynx and can cause tissue damage. Fold the catheter and pull
your glove over the catheter to reduce contamination when discarding the catheter.
7. Oral hygiene should follow any tracheostomy suctioning procedure. It is essential to maintain a clean, moist oral cavity.
8. Document vital signs, patient assessment before and after suctioning, amount, color, consistency and odor of
secretions obtained.
- Sterile suction catheter kit
- Sterile water
- Suction source
- ambu bag connected to 100% oxygen
1. Assess patient's need for
suctioning:
a. Inspiratory wheezing
b. Expiratory crackles
c. Restlessness
d. Ineffective coughing
e. Decreased LOC
f. Decreased breath sounds
g. Tachypnea
h. Tachycardia
i. Bradycardia
j. Cyanosis
k. Hypotension
l. Hypertension
m. Shallow respirations
2. Explain the procedure to pt:
3. Open sterile suction catheter
kit, using appropriate size.
Carefully remove sterile cup.
Fill cup with sterile water.
4. Make sure suction pressure is
set at 120cm H2O for adults,
80 cm in E.D.
5. It is recommended to pre-
oxygenate the patient with the
ambu bag or through the
ventilator and 100% oxygen. This helps to reduce suction-induced hypoxia.
Equipment Preparation:
1. Put on sterile gloves and maintain sterility of dominant hand.
2. Pick up suction catheter and attach to suction source, maintaining sterility of catheter and dominant gloved hand.
3. Dampen catheter in the sterile water to lubricate.
4. Disconnect tube from oxygen source with unsterile hand.
5. Always trace a tube or catheter from the patient to the point of origin before connecting or disconnecting any solution,
infusion or device.
Suctioning Technique:
1. Using sterile hand, gently insert suction catheter fully into trach tube. The tip of the suction catheter should be below
the end of tube. Stimulation of coughing generally indicates catheter is below end of the tube. This helps reduce chance
of a mucous plug forming in the end of the trach tube.
2. Apply intermittent suction by quickly opening and closing suction port with unsterile hand, and withdraw catheter using
a rotating motion. The entire suctioning process should not exceed 10-15 seconds in duration. Intermittent suction
minimizes tracheal tissue damage. Suction is applied only as catheter is being removed to minimize hypoxia.
3. It is recommended to oxygenate, reoxygenate and hyperinflate patient's lungs with ambu bag and 100% oxygen after
each suctioning attempt.
4. The catheter may be flushed with sterile water and the suctioning process repeated as indicated.
5. Upon completion of suctioning, re-attach patient to ventilator or oxygen source. Reassess the patient's respiratory
status.
6. Once trach suctioning has been completed, the oral cavity should be cleansed and suctioned using the suction
catheter as secretions also accumulate in the nasopharynx and can cause tissue damage. Fold the catheter and pull
your glove over the catheter to reduce contamination when discarding the catheter.
7. Oral hygiene should follow any tracheostomy suctioning procedure. It is essential to maintain a clean, moist oral cavity.
8. Document vital signs, patient assessment before and after suctioning, amount, color, consistency and odor of
secretions obtained.
Closed System Procedure

Equipment:
1. Closed suction Catheter
2. 10 or 15 ml saline vials
3. Wall suction set up
Patient Preparation:
1. Twist and unlock suction control button. Be sure suction tubing is connected to ballard suction catheter.
2. Set suction gauge at l60 mm Hg pressure.
3. Attach a large (15 ml) saline vial to irrigation port on t-piece.
4. Advance catheter until a resistance is met. While gripping t-piece with one hand, gently withdraw catheter at l80 degree
angle until the black ring on catheter is visible. Use intermittent suction by pushing down on control button. Remember
that suctioning should not exceed 10-15 seconds in duration.
5. Rinse catheter with a generous amount of normal saline.
6. Repeat as necessary.
7. When completed, twist and lock suction control button. Place catheter on either side of patient's head.
8. Attach oral yankauer to suction patient's mouth, as needed and perform for oral care. It is essential to maintain a clean,
moist oral cavity in the intubated patient.
1. Closed suction Catheter
2. 10 or 15 ml saline vials
3. Wall suction set up
Patient Preparation:
- See Patient Preparation Open Technique number 1. and 2.
- Need for hyperinflation and hyperoxygenation may not be necessary with the closed system. If patient demonstrates poor tolerance with suctioning procedure, hyperinflation and hyperoxygenation may be utilized.
1. Twist and unlock suction control button. Be sure suction tubing is connected to ballard suction catheter.
2. Set suction gauge at l60 mm Hg pressure.
3. Attach a large (15 ml) saline vial to irrigation port on t-piece.
4. Advance catheter until a resistance is met. While gripping t-piece with one hand, gently withdraw catheter at l80 degree
angle until the black ring on catheter is visible. Use intermittent suction by pushing down on control button. Remember
that suctioning should not exceed 10-15 seconds in duration.
5. Rinse catheter with a generous amount of normal saline.
6. Repeat as necessary.
7. When completed, twist and lock suction control button. Place catheter on either side of patient's head.
8. Attach oral yankauer to suction patient's mouth, as needed and perform for oral care. It is essential to maintain a clean,
moist oral cavity in the intubated patient.
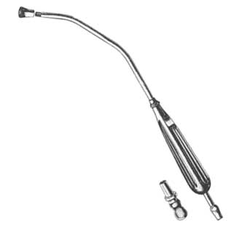
Yankauer
Complications:
- Hypoxemia
- Atelectasis
- Cardiac arrhythmias
- Healthcare Associated pulmonary tract infections
- Tracheal mucosal trauma
- Accidental extubation
Related care:
1. Bottles of sterile water should be dated when opened and discarded after 24 hours of use.
2. The suction collection canister should be emptied every 8 hours or when two-thirds full. The suction tubing and canister
should be changed every 72 hours.
3. Suctioning of the nose and mouth should occur after the trachea has been cleared, never before with the same catheter.
4. Maintain rigorous sterile technique when suctioning the intubated patient, as these patients are predisposed to infection.
5. Normal saline instilled into an trach tube prior to suctioning is not recommended. This practice does not thin secretions or
mobilize them for removal but could increase the patient's risk for infection if used.
Tips:
- If possible, have the patient lean forward and cough out secretions from tracheostomy
- If secretions are dry or thick, utilize humidification
- If appropriate, deflate the cuff to keep secretions from pooling
- If patient is in respiratory distress, don't leave the patient alone.
Signs and Symptoms of Hypoxia:
You may not even recognize the symptoms of hypoxia because hypoxia is insidious in its onset. The signs and symptoms can be different for every person and may not occur in the same progression as listed below. Therefore, it is important to be aware of all the signs and symptoms.
Signs:
Signs:
- Rapid Breathing
- Cyanosis
- Poor Coordination
- Lethargy/Lassitude
- Executing Poor Judgment
- Air Hunger
- Dizziness
- Headache
- Mental and Muscle Fatigue
- Nausea
- Hot and Cold Flashes
- Tingling
- Visual Impairment
- Euphoria
